Sunday, June 3, 2012

Finished project: Egypt scrapbook

When I was 16 I went on the trip of a lifetime to Egypt with some other students. We had a fabulous time visiting the Pyramids, the Karnak temple, the Valley of the Kings, and other sites. We spent time in Cairo, Luxor, Edfu, Aswan and Alexandria. I can honestly say that it was the most fun that I have ever had on a trip -- to date!

After that trip, I resolved to make a scrapbook of my memories. Over the years I did a page here and there but it wasn't until this year that I realized that I had to finish it. It took me 12 years but now I can proudly say that the scrapbook is finished! The last thing that I did was a fabric scrapbook cover.

Here are some shots of it:


My title page to the Egypt Trip


Karnak Temple


The Valley of the Kings


The Egyptian Museum

Scrapbook cover

To finish my Egypt scrapbook, I made a fabric scrapbook cover for it. I really like this one better than the one that I made out of T-shirts!


For this project, I used approx. 1/2 m canvas-weight fabric, 1 spool matching heavy-duty thread, 1 button, 18 inches of matching yarn, a sewing machine, a hand-sewing needle, a measuring tape, a dressmarkers pen, pins and scissors.

First, I measured my scrapbook binder. This is a simple 1-inch binder with plastic page protectors.


I measured length (21 inches)...


And I measured height (11.5 inches).


I used those measurements on the wrong side of my fabric and marked them three times from the top to the bottom with a dressmakers pen. I allowed about 0.5 cm on both sides for seam allowance. I cut out a piece that was 22 inches wide by 12.5 inches tall.


Then I measured the inside of the binder (9 inches).


I marked this on the fabric and cut out a piece that was 9 inches wide by 12.5 inches tall for the inside.


I had three pieces...


Sidenote: I have to mention these AWESOME coconut shell buttons that I found into Wal-mart...


So, the finished product will look like this on the inside. First thing to do is sew down the facing edge of the two inside pieces. 


I did a double seam...


Then, I pinned the two inside pieces to the larger outside piece. This was pinned right side to right side so that it would turn inside out correctly.


Then I turned it inside out...


voila!


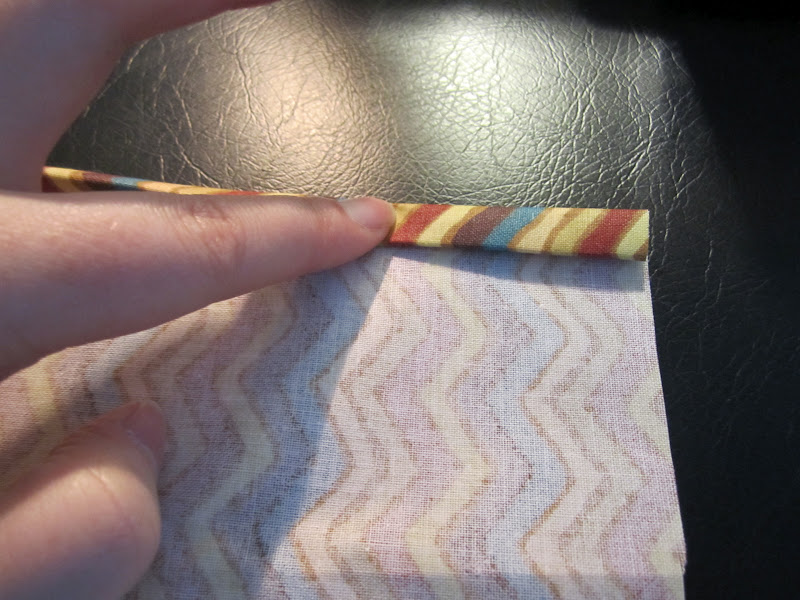
Now to finish the seam for the spine. I simply folded it down and pinned it at the top and the bottom then sewed them down.


Here it is, almost done!


Now for the button. I sewed it on the front...


And I hand-sewed the centre of the 18-inch string of brown yarn to the back. 


I then wrapped the two strands of yarn around the button on the other side of the binder three times.


I pulled the yarn back and tied a knot where I was going to cut it.


I tied three knots to keep it strong.


Then I cut off the excess. Done!

Estimated time for this project: about 1 hour, perhaps a little more for the sewing of the button and the yarn.

Sunday, April 29, 2012

Unintended hiatus

Well, I guess it's obvious that I have been on an unintended hiatus for the past two months. I have been so busy with life that this blog has had to take a backseat for a little while.

Rest assured, I still have lots to say and share. I am working on many projects which I intend to post over the next month. I will be back soon.

Monday, March 26, 2012

The Monogrammed Laptop Sleeve

I made this red "M" laptop sleeve as a gift for a friend for her 13-inch Macbook. It is a fabulous personalized gift!


Needle: US8 24-inch circular
Yarn: Bernat Super Saver yarn in Burgundy (worsted weight)


Pattern:

Cast on 90 stitches. Knit for 8 rows.

Knit in stockinette (purl one row, knit one row) for 22 rows, finishing on the RS (Right side).

Start monogram (I used the letters from this website):
*Knit all even rows

Row 23 (WS, wrong side): p14, k6, p9, k6, purl to the end.
Row 25: Knit.
Row 27: p14, k6, p9, k6, purl to the end.
Row 29: p13, k7, p9, k7, purl to the end.
Row 31: p13, k8, p7, k8, purl to the end.
Row 33: p15, k8, p3, k8, purl to the end.
Row 35: p15, k9, p1, k9, purl to the end.
Row 37: p15, k19, purl to the end.
Row 39: p15, k4, p1, k9, p1, k4, purl to the end.
Row 41: p15, k4, p2, k7, p2, k4, purl to the end.
Row 43: p15, k4, p3, k5, p3, k4, purl to the end.
Row 45: p15, k4, p4, k3, p4, k4, purl to the end.
Row 47: p15, k4, p5, k1, p5, k4, purl to the end.
Row 49, 51, 53 and 55: p15, k4, p11, k4, purl to the end.
Row 57, 59 and 61: p13, k8, p7, k8, purl to the end.

Rows 62 to the end: knit even rows, purl odd rows in stockinette for about 5 more inches (about 40 more rows). Bind off loosely and leave a 2 foot tail. Sew the cover up on the wrong side along the edges using the mattress stitch then weave in all ends.


 Estimated time for this project: one week, that is, one hour per day for about 7 days.

Notes:
  • For any of the letters from the above website, you will need to knit them in reverse (top-down). Most of the patterns there are written from the bottom up.
  • The "M" design is (c) Rhonda K. White, done in 2005. Again, the link to this website is <http://www.knittingknonsense.com/M_cloth.html>. I do not claim this design as my own, I merely incorporated it into my laptop sleeve design.
Ideas:
  • This is a great unisex design for a Mac laptop sleeve. 
  • If you don't like the letters designed in the website credited in this post, you are free to try it with others!
  • For other computers, try this trick: cast on 7 more stitches per inch. This is for a 13-inch Macbook, but a 14-inch laptop would be 97 stitches, a 15-inch would be 104 stitches, etc. Also add 7 more rows at the end per inch to keep it even.

Sunday, March 18, 2012

Orange Creamsicle Fruit Dip

Have you ever had an insatiable craving for a creamsicle? It's become a popular flavor these days and I decided to try it out as a fruit dip with Greek yogurt, honey and a few tasty orange-y ingredients! It was a wild success with my husband and myself!

 (Sorry about the picture! I didn't think that I was going to take one until I took a bite)

Ingredients:
  • 2/3 cup light or fat-free sour cream
  • 3/4 cup plain Greek yogurt (the real stuff, not the "Greek-style")
  • 2-3 tablespoons orange marmalade, low sugar
  • 1 tbsp orange juice concentrate (I used Minute Maid's Low Acid variety)
  • 1/2 tsp orange blossom water
  • 1 tsp creamy honey (or, to taste)
Directions: combine all ingredients in a dish and stir together well. Serve with varied fruit like kiwi, banana, apple, strawberry, oranges or berries.

Serves 4 with 1 cup of fruit on the side.


Nutritional information (from Lose It!) for 1 serving of dip: 112 calories, 2g fat (1.3g saturated), 10.4 mg cholesterol, 71.8 mg sodium, 17.6g carbs (0.2g fiber, 12.5 g sugars), 5.9g protein.

Notes:
  • Orange Blossom water is available in the specialty section of grocery stores or Middle Eastern food stores. It's extremely powerful stuff though so note that if you want to experiment with it!
  • I just made this up on the fly. I had no idea that it would be so good! As a matter of fact, the measurements provided are for all that I had left of the sour cream and the Greek yogurt. I just wanted wanted to use them up.
  • Real Greek yogurt has around 18g protein for a 3/4 cup serving. I use the PC Greek yogurt brand, available here in Canada.
Ideas:
  • This would be seriously fantastic with some crushed, canned mandarins and a little of the juice instead of the marmalade and orange blossom water. 
  • Another great idea is to replace the sour cream with plain kefir. As a matter of fact, that just might be my next combination. I'm getting hungry just thinking about it!

Sunday, March 4, 2012

How to find an organization scheme for documents

These days, we seem to be buried by things to organize - especially when it comes to paper, documents and bookmarks. We always say that we can't ever seem to find anything despite our best efforts!


Here is an idea: why not develop a plan for your paper and electronic documents? Some people develop a plan for one but neglect the other. This way, you know that if you have education related folders in the filing cabinet you also have them labelled the same way on your computer.


Here are some tips that I have learned over the past years when it comes to organization documents:
  1. Think of how you use these documents now and in the future. For example, if you are in school now you might not be in three years. So those files won't be used as often as they are now but you still want them in a place where you can find them.
  2. Also consider which documents you use often versus those that you don't. For example, you always need to find your taxes, paystubs and bills quickly versus old drawings that you did when you were five.
  3. Create a very basic organization plan. Use general headings and very easy organization. Here is a sample:
    • Learning applies to all levels of schooling, careers and jobs and research so all folders relating to these topics can go in this general group.
    • Self-Improvement applies to topics like finances, health, beauty, fashion, weight loss, etc. So all documents relating to these topics can go into this larger grouping. 
    • Planning applies to topics house/home, children, travel, holidays, car, etc. So all documents relating to anything that requires planning can go here. 
    • Entertainment includes all documents relating to movies, music, hobbies and any type of entertainment.
  4. Keep documents within three levels. This is an easy way to track your documents and a basic rule when it comes to web design as well. Here are a few samples:
    • Learning >> University >> Year 1
    • Learning >> Career >> Name of Employer
    • Self-Improvement >> Finances
    • Self-Improvement >> Health >> Menu Plans
    • Planning >> House >> Renovation 2008
    • Planning >> Holidays >> Christmas
    • Entertainment >> Movies >> Movie Stubs
    • Entertainment >> Hobbies >> Knitting 
  5. Use this plan for electronic and paper versions of your documents. Apply this to your bookmarks, electronic filing system and paper filing system. This becomes very useful because once it is in place, you know will have an idea of where to find something three years from now as well as tomorrow. 
  6. Write up your plan. Create a document that lists how your files are organized, both paper and electronic. This will help you out in the future.
  7. Put the plan into practice. Take an afternoon or two to put the documents into folders organized according to your plan.  
Hopefully, these tips are helpful for you to weed through those piles of documents and papers that you have.

Links:

    The Dropped-Stitch Earwarmer

    This earwarmer is inspired by two things: my love affair with purple and with the dropped stitch pattern. I wanted something to match by scarf but to not stand out or compete with it. So, I came up with this idea. It goes with the dropped-stitch kit that I have been making (scarf, earwarmer and fingerless gloves).


    To start, I measured my head with a measuring tape. Mine is 22 1/4 inches so I can start from there. Behind my head from ear to ear, I measure 8 inches.

    Abbreviations used in this pattern:
    M1R - make 1 right
    M1L - make 1 left
    YO - yarn over
    K - Knit
    P - Purl
    K2 tog - Knit two together
    BO - Bind off

    Needles: US8 straight needles
    Yarn: Bernat Super Saver worsted weight yarn in lilac-colour

    Pattern:

    Cast on 10 stitches. Knit for 3 inches or 28 rows.

    Row 29: K1, M1R, K8, M1L, K1. You now have 12 stitches.
    Row 30: Knit.
    Row 31: K1, M1R, K10, M1L, K1. You now have 14 stitches.
    Row 32: Knit.
    Row 33: K1, M1R, K12, M1L, K1. You now have 16 stitches.
    Rows 34-62: Knit.
    Row 63: K6, YO once, K1, YO twice, K1, YO three times, K1, YO twice, K1, YO once, K1, K6.
    Row 64: Knit and drop all YO.
    Rows 65-66: Knit.
    Row 67: *K1, YO once, K1, YO twice, K1, YO three times, K1, YO twice, K1, YO once, K1, K6, then repeat from * until end.
    Row 68: Knit and drop all YO.
    Row 69-117: Knit.
    Row 118: *K1, YO once, K1, YO twice, K1, YO three times, K1, YO twice, K1, YO once, K1, K6, then repeat from * until end.
    Row 119: Knit and drop all YO.
    Row 120-121: Knit.
    Row 122: K6, YO once, K1, YO twice, K1, YO three times, K1, YO twice, K1, YO once, K1, K6.
    Row 123: Knit and drop all YO.
    Rows 124-151: Knit.
    Row 152: K1, K2 tog, K10, K2 tog, K1. You now have 14 stitches.
    Row 153: Knit.
    Row 154: K1, K2 tog, K8, K2 tog, K1. You now have 12 stitches.
    Row 155: Knit.
    Row 156: K1, K2 tog, K6, K2 tog, K1. You now have 10 stitches.
    Rows 157-174: Knit.
    Row 175: BO loosely and keep a 12-inch tail.

    Sew up the two end pieces using a wool needle and the 12-inch tail then trim off extra thread.