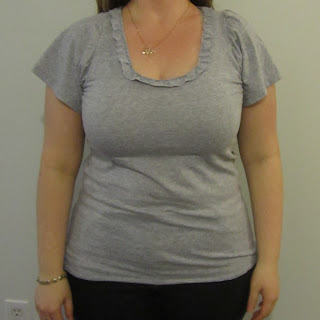
Into this?
Cute, eh? For this project, you will need your favorite shirt (that fits you very well), scissors, pins, matching thread and a sewing machine.
This is how to do it. First, take a shirt that actually fits you well and lay it over the men's t-shirt (this one is a size large) like so:
Make sure both are lying absolutely flat and that the seams are lined up (shoulder seams, neck, sides, etc.). Now, take a good pair of scissors and cut the fabric away from the bottom seam, leaving about 2 cm seam allowance. Cut the sleeves off. Cut the extra fabric away from the armholes, leaving seam allowance. And cut up the sides, leaving about 2 cm seam allowance.
Now, cut the neck as desired. To do this, I cut the ribbed collar off then measured the front against my favorite shirt (not the back, you don't want to cut both). I folded the men's shirt front over so that the sides were touching each other and then I cut some of the neck away.
Now comes the re-assembly. Turn the shirt wrong-side out and pin down the sides. I didn't leave much seam allowance then I sewed them both down and did a zig-zag stitch along the edges (although, if you have a serger, you can do that).
Once the two sides are zipped up, I tried the shirt on. I wanted to see where the bottom was hitting me and how much I had to take it in. So, I did a zigzag stitch along the edge of the bottom to secure it then I pinned the fabric down with about 1 cm seam allowance and sewed it down.
Now we arrive at the neck. I took the bottom of the shirt that I had cut off and I trimmed the sewn edge of the former shirt so that I had a long, straight strip of fabric about 2 cm wide. I pinned this long edge to the neck of my shirt in tucks to create a ruffled edge like so:
I had just enough fabric to pin it in tucks all around the neck like so:
Then, I sewed the strip to the shirt with a straight stitch on the sewing machine, going in the direction of the tucks (not against it). Here it is sewn down:
Almost done. Time to sew the sleeves to the armholes. I didn't modify these at all because I wanted to create gathered sleeves and I would need the extra fabric.
So, for the armholes, turn the shirt and sleeves inside out. On the armhole, match the inside seam of the shirt up to the seam of the arm. Star pinning the sleeve to the shirt for about 4-5 pins up on both sides, trying to be even. Then, I started doing evenly spaced tucks on every pin, with more at the shoulder seam, on both sides until I reached the top.
I sewed the sleeve to the shirt, backstitching on the armhole for a strong seam, then did the zigzag stitch on the raw edge. I did this with the second sleeve and voila!
Frilly, girly t-shirt is complete.
Estimated time for this project: 1 hour, 45 minutes. This was mostly in the pinning of the neck and the sleeves. Everything else was a breeze.
Notes:
- I actually took in the shoulders a little too much so the next time that I do something like this, I won't cut so much of the shoulders away.
- A serger would be a huge help on this.
- It is a good idea to wash your shirt before remodelling it, that way it doesn't shrink.
- Look at how your favorite shirt fits you before using it as a model in this project. It it pulls at the belly (like mine does) then cut a little more room on this one.
- Leave the shirt sleeveless, if you'd like. You can leave extra fabric on the armholes, pin it down and sew it for a cleaner edge.
- You can leave the shirt longer for a tunic-length but then you won't have any extra fabric to make a ruffly neck.
- Try making this shirt with serged or zigzagged edges to create frilly edges. I found this out when making my wristlets.
- Try using contrasting thread, especially if it will be seen in the above suggestion.
- I was going to take some of the leftover fabric from the sides and make a rosette (or two, or three) and then sew it onto the shirt. Great idea! Still thinking about it...


No comments:
Post a Comment